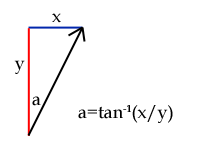
(Note that when I refer to x and y coordinates here, I refer to x as the axis pointing East and y as the axis pointing North).
Calculating the angle requires little more than a simple grasp of trigonometry. The basic formula for an angle given the x and y lengths are:
Well... almost. It's good enough for the -90° to 90° range at the top half of the screen. Think about it this way: if x=1 and y=1, the pixel would be 45° clockwise from North. Try that on a calculator, and you'll find that tan-1(1/1)=45° as you'd expect. Now, if x=-1 and y=-1, you'd think that the pixel would be 225° from North. However, tan-1(-1/-1)=45°. Ah. This is because 1/1 and -1/-1 both equal 1. How can you fix this, then? Well, it's very easy: all you have to do is check to see if the pixel lies in the bottom half of the screen: if y<0, it is in the bottom half. In this case, add 180° to the calculated angle.
You might have noticed one other problem - a nasty divide-by-zero error when y=0. This, again, is easy to remedy - check to see if x is less than 0. If it is, the angle is -90°, else the angle is 90°.
This entire process is best demonstrated with a bit of pseudo-code:
for y is 0 to screen_height - 1
    for x is 0 to screen_width - 1

        // First, we need to calculate the offset to
        // the pixel (the x,y coordinate relative to
        // the centre of the screen.
        // y is calculated "backwards" to x as screen
        // (x,y) are different to normal mathematical
        // (x,y) [on a screen, the y axis points South,
        // whereas we normally treat it as pointing
        // North].

        relative_x = x - screen_width / 2
        relative_y = screen_height / 2 - y

        // Next, we check to see if y is zero to trap
        // any divide-by-zero errors:
        if relative_y = 0 then
            if relative_x < 0 then
                angle = -90
            else
                angle = 90
            end if
        else
             // y is not zero, so use atan (tan-1) to
             // calculate the angle.
            angle = atan(relative_x/relative_y)
        end if

        // Finally, check to see if we're in the
        // bottom half, and if so, fix the angle.
        if relative_y > 0 then
            angle = angle + 180
        end if

        // Last of all, save the angle to our table.
        angle_lut(x,y) = angle

    next x
next y
When implementing the code for real, there are some things you need to look out for:
translated_angle = angle_in_radians / (2 * π) * texture_size
Once you have set up the angle table, it is a very simple job to test it (and I believe in checking as I go along!) Write some code that cycles through each pixel, gets the corresponding value from the angle table and sets the pixel a colour based on that value. If your "angles" are in the range 0-255, you can write that pixel value directly - you should see a radial pattern. You could even use those pixel values to read as an x-value from your texture, and you should be able to read in the top row of pixels as a radial pattern.
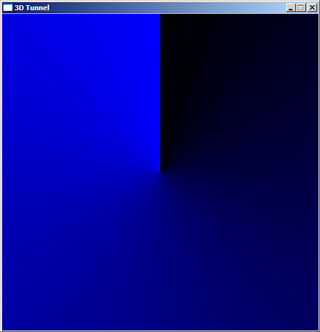
Here is the result of such a test - the display is blue as I was writing to a 32-bit surface where the least significant byte (0-255) represents the blue component of a colour. If your results don't quite look like this, don't panic:
Now, take a breather - you're half-way there!