Ben Ryves 2007 for MaxCoderz.
A routine and test application to send and receive data using the SIRCS (Sony infrared controller) protocol.
I haven't found any formal documentation on the protocol, so the project was built using a number of sources of information as well as my own research and testing.
Many thanks to the following:
For testing purposes I have used a Sony RM-826 and Sony DVD/PlayStation remote control. The RM-826 (12-bit) can be configured to send to different devices; the PlayStation remote controller transmits 20-bit commands. I have not got access to any 15-bit remote control units.
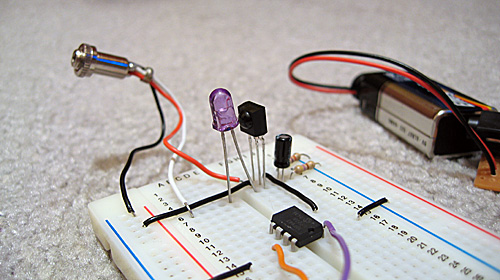
The hardware is easy enough to assemble. You can build either the transmitter, receiver, or both.
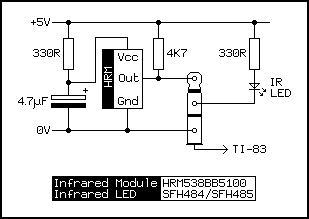
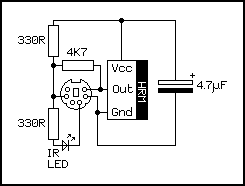
For the transmitter, you need the following parts:
| Part | Rating/Part Number |
|---|---|
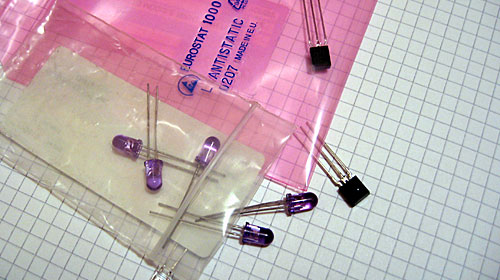
| Infrared LED | SFH 484 or SFH 485 |
| Current-Limiting Resistor | 330Ω |
The receiver is more complex, and requires the following parts:
| Part | Rating/Part Number |
|---|---|
| Infrared Module | HRM538BB5100 (38kHz) |
| Smoothing Capacitor | 4.7µF |
| Current-Limiting Resistor | 330Ω |
| Pull-Up Resistor | 4.7KΩ |
The circuit layout is as follows. Note that you omit either side of the design to suit your needs. It has been presented as a suggestion; check the datasheets for your parts and adjust the layout or ratings of components to suit.
If you have already constructed a PS/2 adapter for your calculator, you can plug the components into that instead (viewed from the PS/2 socket):
Each command is made up of two parts; a button press code and a device ID.
The device ID is used to target a particular device (for example, to differentiate between sending a channel up command between a TV and a VCR).
An added complication is that command words can be different lengths. The three I know of are 12-bit, 15-bit and 20-bit.
The software routines return or take as inputs the three different parameters:
| Register | Parameter |
|---|---|
| c | Command code. Only the least significant 7 bits are used. |
| de | Device code. For 12-bit controllers the lower five bits of E are used, for 15-bit controllers only E is used, and for 20-bit controllers the lower 5 bits of D are used along with E. |
| a | Command word size (measured in bits). |
You must reset any bits in parameters that are unused, otherwise the timing between writes will be incorrect.
A single physical device can respond to multiple device IDs - a TV with Teletext support will respond to both TV and Teletext device IDs.
See the appendices for some sample codes.
Included is a piece of software that can be used to turn your TI-83+ series calculator into a programmable remote control. It uses a simple GUI that should hopefully be pretty self-expanatory.
If you do not have any layout files installed, the software will prompt you to create one when you first start it. It cannot be used without a layout file.

At the default screen you can carry out a number of actions:
Press the softkey (F1 to F5) under each option to carry out its action.
Pressing any of the other buttons on the calculator's keypad will transmit the command you have associated with that particular key.
The software uses its own text input routines. Press Alpha to cycle through input modes - uppercase, lowercase, numbers and special keys. Press Del to step backwards and correct mistakes, and press Enter to confirm.
The input routines automatically correct you when you are entering text in a mode that the current field doesn't support (for example; switch between numeric and uppercase modes when entering hexadecimal values).
When the device you wish to edit is active, go into the Edit mode. You will need to press the key (on the calculator) that you wish to customise.
Any key apart from the F1-F5 keys can be edited (even the On key)! You can then edit each of the three properties of the key - command word length, device code and command code - by moving the selection arrow up and down then pressing Enter to start editing.

If the command word length is set to 0, the key is effectively disabled and all of the options disappear. You can still edit them, however.
If you have built and attached the receiver to your calculator you can speed up data entry by simply pointing your remote control at it and pressing the button you want to associate with a key. It will be assigned automatically.
I've bundled a few layout files with this release; I'm sure you'll want to edit them to your own requirements but they can at least help to illustrate how the program works.
| Key | Function |
|---|---|
| On | Power |
| Mode | Cycle Auxillary Devices |
| Del | Teletext |
| 0 to 9 | Button 0 to 9 |
| (-) | -/-- |
| ↑/↓ Up/Down | Volume Up/Down |
| ←/→ Left/Right; −/+ | Previous/Next Channel |
| Clear | Mute |
| Key | Function |
|---|---|
| On | Power |
| 0 to 9 | Button 0 to 9 |
| (-) | -/-- |
| ↑ Up | Play |
| ↓ Down | Pause |
| ← Left | Rewind |
| → Right | Fast Forwards |
| Clear | Stop |
| −/+ | Previous/Next Channel |
| Prgm | Record |
| Key | Function |
|---|---|
| 0 to 9 | Button 0 to 9 |
| Clear | Clear |
| Apps | Menu |
| ↑/↓/←/→ | ↑/↓/←/→ |
| Enter | Enter |
| Sin | Play |
| Cos | Pause |
| Tan | Stop |
| (/) | Previous/Next |
| ÷/× | Scan Backwards/Forwards |
| −/+ | Slow Backwards/Forwards |
| Del | Return |
| , | Subtitles |
| Math | Angle |
| 2nd | Display |
| Alpha | Title |
There are three routines; one covers receiving data and the other two cover transmitting data. All three use the same register set for ease of use.
The Read routine will read and decode a single command. If it times out, or an invalid number of bits were read, it clears Z and returns.
For increased reliability, read multiple commands until two match. If you want a blocking version of the routine, poll the least significant bit of the link port status until it goes low and then call Read.
| Read | Receives data from a Sony IR remote control. |
|---|---|
| Outputs | z on success, nz on failure. |
| de = target device ID (variable bit length). | |
| c = command. | |
| a = length of command word (bits). | |
| Destroys | af, bc, de, hl. |
| Remarks | Disables interrupts. |
To send a single command, use the Write routine.
| Write | Send data using the Sony IR controller protocol. |
|---|---|
| Inputs | de = target device ID (variable bit length). |
| c = command. | |
| a = length of command word (bits). | |
| Destroys | af, bc, de, hl. |
| Remarks | Disables interrupts. Bits that are not to be sent should be reset (eg command should only be in the 0..127 range). Setting them can result in inaccurate timing. |
You should send data at 45mS intervals; to make this easier you can use the WriteMultiple routine that handles all the mucky timing for you. The Sony remote controls I have access to all seem to send data a minimum of 3 times for each button press.
| WriteMultiple | Send data multiple times. |
|---|---|
| Inputs | de = target device ID (variable bit length). |
| c = command. | |
| a = length of command word (bits). | |
| b = number of times to send the data. | |
| Destroys | f, b, hl. |
| Remarks | Disables interrupts. Bits that are not to be sent should be reset (eg command should only be in the 0..127 range). Setting them can result in inaccurate timing. |
(Exact timings may vary slightly).
The transmitter sends a series of carefully timed bursts of infrared light, modulated at 40kHz. Each command is made up of 12, 15 or 20 bits of data and one start bit.
The timing is based around multiples of 0.6mS. There is a 0.6mS delay ('silence') between each bit. The start bit is 2.4mS long, a 0 bit is 0.6mS long and a 1 bit is 1.2mS long.
The data is sent least significant bit first, and the command ID is sent before the device ID.
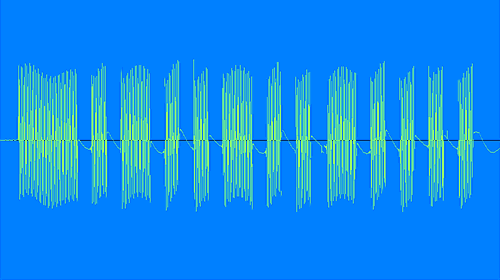
If you look at the image above (produced by recording the output of the TI-83 Plus) you can clearly see there are 'thin', 'fat' and one 'terminally obese' burst corresponding to the timings above.
The exact sequence looks to be S010010010000, which would make the control code %0010010 ($12) and the device ID %00001 ($01); that's the volume up button for a TV.
Each command should be sent at least three times, at intervals of 45mS. That's 45mS overall; not a 45mS delay between commands - the start bit of the second command should be transmitted 45mS after the start bit for the first was transmitted. This makes timing rather more interesting (as commands are different lengths depending on how many bits were sent) but can be easily worked around by counting set bits afterwards and working out how much to pad the command with silence so that they're always the same length.
| ID | Device |
|---|---|
| $01 | TV |
| $02 | VTR1 |
| $03 | Teletext |
| $04 | Widescreen |
| $06 | MDP/LaserDisk |
| $07 | VTR2 |
| $0B | VTR3 |
| $0C | Surround Sound Processor |
| $10 | Audio/Cassette Deck and Tuner |
| $11 | CD Player |
| $12 | Pro-Logic/Equalizer |
| $1A | DVD Player |
| $A4 | TV Digital Effects (15-bit) |
| $093A | PlayStation 2 (DVD) (20-bit) |
| $1B5A | PlayStation 2 (PS2) (20-bit) |
The PlayStation 2 remote controller is an interesting one - it generates two different device IDs depending on whether you are pressing a DVD-player related button or one of the PS2-related buttons. There are four buttons on the controller that apply to both modes - the up, down, left and right buttons - and the controller sends out alternating DVD and PS2 codes for these buttons.
By truncating the PS2 DVD remote controller's device ID down to 5 bits you get $1A, which is the usual code for a DVD player.
I cannot vouch for most of these command IDs, so best to check against a real remote control before using them.
| ID | Function |
|---|---|
| $00 | 1 Button |
| $01 | 2 Button |
| $02 | 3 Button |
| $03 | 4 Button |
| $04 | 5 Button |
| $05 | 6 Button |
| $06 | 7 Button |
| $07 | 8 Button |
| $08 | 9 Button |
| $09 | 10 Button/0 Button |
| $0B | Enter |
| $10 | Channel Up |
| $11 | Channel Down |
| $12 | Volume Up |
| $13 | Volume Down |
| $14 | Mute |
| $15 | Power |
| $16 | Reset TV |
| $17 | Audio Mode: Mono/SAP/Stereo |
| $18 | Picture Up |
| $19 | Picture Down |
| $1A | Color Up |
| $1B | Color Down |
| $1E | Brightness Up |
| $1F | Brightness Down |
| $20 | Hue Up |
| $21 | Hue Down |
| $22 | Sharpness Up |
| $23 | Sharpness Down |
| $24 | Select TV Tuner |
| $25 | Cycle Auxillary/External Modes |
| $26 | Balance Left |
| $27 | Balance Right |
| $29 | Surround On/Off |
| $2A | Aux/Ant |
| $2F | Power Off |
| $30 | Time Display |
| $36 | Sleep Timer |
| $3A | Channel Display |
| $3B | Channel Jump |
| $3F | Teletext Mode |
| $40 | Select Input Video 1 |
| $41 | Select Input Video 2 |
| $42 | Select Input Video 3 |
| $4A | Noise Reduction On/Off |
| $4E | Cable/Broadcast |
| $4F | Notch Filter On/Off |
| $58 | PIP Channel Up |
| $59 | PIP Channel Down |
| $5B | PIP On |
| $5C | Freeze Screen |
| $5E | PIP Position |
| $5F | PIP Swap |
| $60 | Guide |
| $61 | Video Setup |
| $62 | Audio Setup |
| $63 | Exit Setup |
| $6B | Auto Program |
| $70 | Treble Up |
| $71 | Treble Down |
| $72 | Bass Up |
| $73 | Bass Down |
| $74 | + Key |
| $75 | - Key |
| $78 | Add Channel |
| $79 | Delete Channel |
| $7D | Trinitone On/Off |
| $7F | Displays a Red RtestS on the Screen |
| ID | Function |
|---|---|
| $4C | Red Button |
| $4D | Green Button |
| $4E | Yellow Button |
| $4F | Blue Button |
| ID | Function |
|---|---|
| $00 | 1 Button |
| $01 | 2 Button |
| $02 | 3 Button |
| $03 | 4 Button |
| $04 | 5 Button |
| $05 | 6 Button |
| $06 | 7 Button |
| $07 | 8 Button |
| $08 | 9 Button |
| $09 | 10 Button/0 Button |
| $0B | Enter |
| $0E | Return |
| $0F | Clear |
| $1A | Title |
| $1B | Menu |
| $1F | Program |
| $28 | Time |
| $2A | A↔B |
| $2C | Repeat |
| $30 | Previous |
| $31 | Next |
| $32 | Play |
| $33 | Scan « |
| $34 | Scan » |
| $35 | Shuffle |
| $38 | Stop |
| $39 | Pause |
| $54 | Display |
| $60 | Slow « |
| $61 | Slow » |
| $63 | Subtitle |
| $64 | Audio |
| $65 | Angle |
| $79 | ↑ Up |
| $7A | ↓ Down |
| $7B | ← Left |
| $7C | → Right |
| ID | Function |
|---|---|
| $50 | Select |
| $51 | L3 |
| $52 | R3 |
| $53 | Start |
| $54 | ↑ Up |
| $55 | → Right |
| $56 | ↓ Down |
| $57 | ← Left |
| $58 | L2 |
| $59 | R2 |
| $5A | L1 |
| $5B | R1 |
| $5C | △ Triangle |
| $5D | ○ Circle |
| $5E | X Cross |
| $5F | □ Square |