Fun with IThumbnailProvider
Friday, 28th March 2008
Note: I have been informed that the code below no longer works in Windows 7 due to changes in the way IThumbnailProvider operates. It is recommended that you use unmanaged code instead of the managed solution presented below.
I have started releasing Cogwheel binaries on its project page, so if you'd like a look at the project but can't be bothered to check out and build the source yourself you can now give it a whirl.
One of the newer additions is a savestate mechanism; this is a very lazy bit of code on my behalf as all it does currently is serialise the entire emulator to a file using the BinaryFormatter. This resulted in savestates weighing in at about 6MB; by marking certain private fields (such as look-up tables in the Z80 emulator) as [NonSerialized] it was down to 2MB. To squash it down to the current ~250KB size the savestate is compressed using the zip file classes I've written to handle loading ROMs from zips.
Whilst this is going to change soon (I'm currently working this on an simple INI file serialiser, so the savestate files will be compatible with later releases of the software) I decided to experiment with the idea of dumping extra data into the savestate - namely, a screenshot.
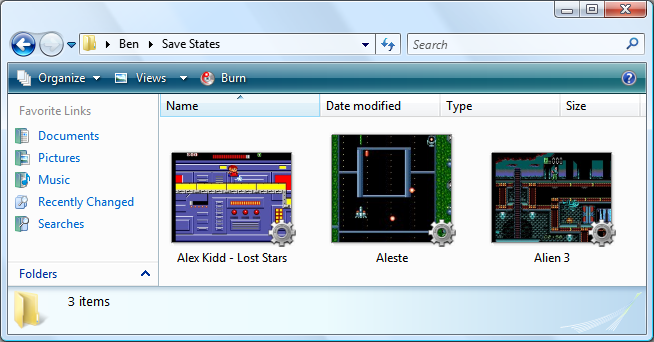
The screenshot is simply saved as Screenshot.png in the root of the savestate's zip archive. Creating a thumbnailer is extremely easy under Vista, and as the thumbnailer runs out-of-process you can use .NET code! Here's a quick and dirty run-down of how to make them if you decide to write one yourself.
Setting up the project
Create a new class library project in Visual Studio, then go switch to its project properties editor. On the Application tab, set Target Framework to something sensible (I currently try and keep everything at .NET 2.0 level), then click on the Assembly Information button and tick the Make assembly COM-Visible box.
Finally, move to the Signing tab, and tick the box marked Sign the assembly. From the drop-down box, pick New, which will create a new key file and add it to the project (this is required later for COM registration).
Add the COM interface wrappers
This is a simple copy and paste job! Just bung this in a source file somewhere:
using System;
using System.Runtime.InteropServices;
using System.Runtime.InteropServices.ComTypes;

namespace Thumbnailer {

	/// <summary>
	/// Defines the format of a bitmap returned by an <see cref="IThumbnailProvider"/>.
	/// </summary>
	public enum WTS_ALPHATYPE {
		/// <summary>
		/// The bitmap is an unknown format. The Shell tries nonetheless to detect whether the image has an alpha channel.
		/// </summary>
		WTSAT_UNKNOWN = 0,
		/// <summary>
		/// The bitmap is an RGB image without alpha. The alpha channel is invalid and the Shell ignores it.
		/// </summary>
		WTSAT_RGB = 1,
		/// <summary>
		/// The bitmap is an ARGB image with a valid alpha channel.
		/// </summary>
		WTSAT_ARGB = 2,
	}

	/// <summary>
	/// Exposes a method for getting a thumbnail image.
	/// </summary>
	[ComVisible(true), Guid("e357fccd-a995-4576-b01f-234630154e96"), InterfaceType(ComInterfaceType.InterfaceIsIUnknown)]
	public interface IThumbnailProvider {
		/// <summary>
		/// Retrieves a thumbnail image and alpha type.
		/// </summary>
		/// <param name="cx">The maximum thumbnail size, in pixels. The Shell draws the returned bitmap at this size or smaller. The returned bitmap should fit into a square of width and height <paramref name="cx"/>, though it does not need to be a square image. The Shell scales the bitmap to render at lower sizes. For example, if the image has a 6:4 aspect ratio, then the returned bitmap should also have a 6:4 aspect ratio.</param>
		/// <param name="hBitmap">When this method returns, contains a pointer to the thumbnail image handle. The image must be a device-independent bitmap (DIB) section and 32 bits per pixel. The Shell scales down the bitmap if its width or height is larger than the size specified by cx. The Shell always respects the aspect ratio and never scales a bitmap larger than its original size.</param>
		/// <param name="bitmapType">Specifies the format of the output bitmap.</param>
		void GetThumbnail(int cx, out IntPtr hBitmap, out WTS_ALPHATYPE bitmapType);
	}

	/// <summary>
	/// Provides a method used to initialize a handler, such as a property handler, thumbnail provider, or preview handler, with a file stream.
	/// </summary>
	[ComVisible(true), Guid("b824b49d-22ac-4161-ac8a-9916e8fa3f7f"), InterfaceType(ComInterfaceType.InterfaceIsIUnknown)]
	public interface IInitializeWithStream {
		/// <summary>
		/// Initializes a handler with a file stream.
		/// </summary>
		/// <param name="stream">Pointer to an <see cref="IStream"/> interface that represents the file stream source.</param>
		/// <param name="grfMode">Indicates the access mode for <paramref name="stream"/>.</param>
		void Initialize(IStream stream, int grfMode);
	}

}
(You may wish to set the namespace to something more appropriate). As you can see, most of that source file is documentation.
Create your thumbnailer class
First thing you'll need to do here is to generate a GUID for your thumbnailer; this is so that when you register your thumbnailer Windows will know which COM object to create an instance of which it can then call to generate a thumbnail (the GUID of your thumbnailer is attached to the extension of the file via standard file associations - more on that later).
Your thumbnailer class should implement two interfaces; IThumbnailProvider (obviously!) and IInitializeWithStream. Here's a skeleton class for the thumbnailer:
using System;
using System.Drawing;
using System.Drawing.Drawing2D;
using System.IO;
using System.Runtime.InteropServices;
using System.Runtime.InteropServices.ComTypes;

namespace Thumbnailer {

	[ComVisible(true), ClassInterface(ClassInterfaceType.None)]
	[ProgId("YourApp.ThumbnailProvider"), Guid("YOUR-GUID-IN-HERE")]
	public class ThumbnailProvider : IThumbnailProvider, IInitializeWithStream {

		#region IInitializeWithStream

		private IStream BaseStream { get; set; }

		public void Initialize(IStream stream, int grfMode) {
			this.BaseStream = stream;
		}

		#endregion

		#region IThumbnailProvider

		public void GetThumbnail(int cx, out IntPtr hBitmap, out WTS_ALPHATYPE bitmapType) {

			hBitmap = IntPtr.Zero;
			bitmapType = WTS_ALPHATYPE.WTSAT_UNKNOWN;

			try {

				// Thumbnailer code in here...

			} catch { } // A dirty cop-out.

		}

		#endregion
	}
}
You will probably want to set the ProgId to something meaningful, and make sure you set the GUID to the one you just generated.
What will happen is that Windows will first initialise your object by calling IInitializeWithStream.Initialize(), passing in an IStream. The above implementation stores the IStream in a member property for future reference.
Windows will then call IThumbnailProvider.GetThumbnail(). cx is the maximum size of the thumbnail (width and height) you should return; Windows will scale your thumbnail down if you return one that is too large. Do not scale your thumbnail up to match this value; it is perfectly valid to return one that is smaller than the requested value. Also; do not scale your thumbnail up to a square: you should return it at the same aspect ratio of the source image.
For the moment, and for the sake of testing, here's a snippet that will create a bright red thumbnail using GDI+:
using (var Thumbnail = new Bitmap(cx, cx)) {
	using (var G = Graphics.FromImage(Thumbnail)) {
		G.Clear(Color.Red);
	}
	hBitmap = Thumbnail.GetHbitmap();
}
Registration
If you compile your class library at this point you should end up with a single DLL. You need to register this DLL using the command-line tool RegAsm.exe that comes with the .NET framework.
Open an elevated command prompt (you need admin rights for this bit) and set the working directory to the output directory of your DLL. Now, invoke the following command:
%windir%\Microsoft.NET\Framework\v2.0.50727\RegAsm /codebase YourThumbnailer.dllThat's half of the battle; the last bit boils down to conventional file associations.
Run the registry editor, and open the HKEY_CLASSES_ROOT key. You will see a list of keys representing file extensions; find one (or create a new one) to match the extension that you wish to attach your thumbnailer to. Under that create a new key named shellex, and under that create another key named {e357fccd-a995-4576-b01f-234630154e96}. Set its (Default) value to {YOUR-GUID-IN-HERE} - yes, the GUID you created earlier. That should look something like this:
- HKEY_CLASSES_ROOT
- .yourextension
- shellex
- {e357fccd-a995-4576-b01f-234630154e96} = {YOUR-GUID-IN-HERE}
- shellex
- .yourextension
That's it!  You may need to log out then in again (and/or reboot and/or just kill all Explorer instances and restart them) for Explorer to catch on if nothing seems to be working.
A final note: IStream to Stream
The only final hitch is that IStream is not the same as our beloved .NET Stream. I use the following snippet to dump all of the contents of an IStream into an array of bytes (which can then be converted to a stream using new MemoryStream(byte[]) if need be).
private byte[] GetStreamContents() {

	if (this.BaseStream == null) return null;

	System.Runtime.InteropServices.ComTypes.STATSTG statData;
	this.BaseStream.Stat(out statData, 1);

	byte[] Result = new byte[statData.cbSize];

	IntPtr P = Marshal.AllocCoTaskMem(Marshal.SizeOf(typeof(UInt64)));
	try {
		this.BaseStream.Read(Result, Result.Length, P);
	} finally {
		Marshal.FreeCoTaskMem(P);
	}
	return Result;
}
This, naturally, is not a good idea if you're thumbnailing very large files, as it dumps the entire thing into memory!
For more information, take a look at MSDN: Thumbnail Providers, which includes useful information (including how to change the overlay icon in the bottom-right of your thumbnails or the adornments).
The COM wrappers and GetStreamContents() snippet are based on this uberdemo article.
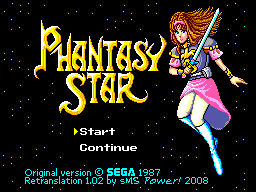
Finally, another screenshot; you can now load IPS patch files directly into Cogwheel using the advanced ROM load dialog - which can be useful for translations.