3D Tunnel
This classic demo-coder's effect uses a very simple idea to split the entire display area into two lookup tables that can be used to quickly render a texture-mapped 3D tunnel.
How does the effect work?
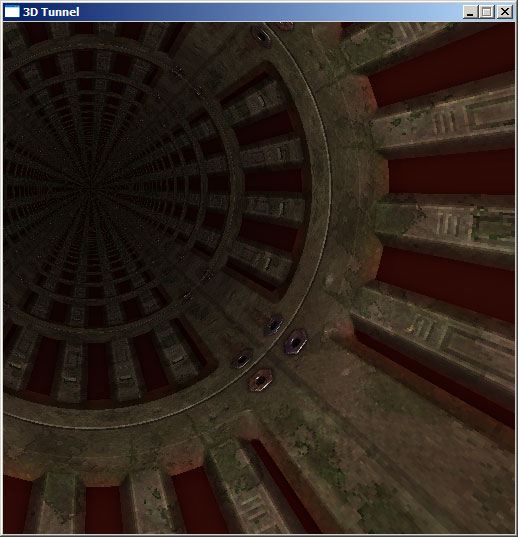
For each pixel on the display, we need to find an x-coordinate and a y-coordinate which can be used to look up a pixel on our texture. If you look at the screenshot of the tunnel above, you should be able to see that the texture wraps on to the walls like this:
The x-coordinate is directly related to the angle of the wall and the y-coordinate to the distance down the tunnel. What we need are two lookup tables - one that holds the angle for each pixel, and another that holds the distance to each pixel.
Calculating lookup tables
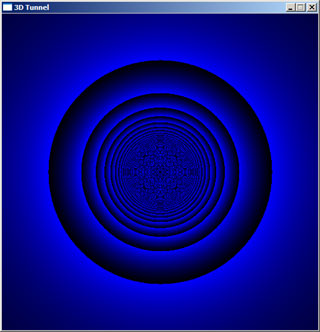
The lookup tables should be the same size as the window. For the sake of simplicity, it's a good plan to start with a square window (the screenshot at the top of this document is from a 512x512 window).
Calculating the angle
(Note that when I refer to x and y coordinates here, I refer to x as the axis pointing East and y as the axis pointing North).
Calculating the angle requires little more than a simple grasp of trigonometry. The basic formula for an angle given the x and y lengths are:
Well... almost. It's good enough for the -90° to 90° range at the top half of the screen. Think about it this way: if x=1 and y=1, the pixel would be 45° clockwise from North. Try that on a calculator, and you'll find that tan-1(1/1)=45° as you'd expect. Now, if x=-1 and y=-1, you'd think that the pixel would be 225° from North. However, tan-1(-1/-1)=45°. Ah. This is because 1/1 and -1/-1 both equal 1. How can you fix this, then? Well, it's very easy: all you have to do is check to see if the pixel lies in the bottom half of the screen: if y<0, it is in the bottom half. In this case, add 180° to the calculated angle.
You might have noticed one other problem - a nasty divide-by-zero error when y=0. This, again, is easy to remedy - check to see if x is less than 0. If it is, the angle is -90°, else the angle is 90°.
This entire process is best demonstrated with a bit of pseudo-code:
for y is 0 to screen_height - 1
    for x is 0 to screen_width - 1

        // First, we need to calculate the offset to
        // the pixel (the x,y coordinate relative to
        // the centre of the screen.
        // y is calculated "backwards" to x as screen
        // (x,y) are different to normal mathematical
        // (x,y) [on a screen, the y axis points South,
        // whereas we normally treat it as pointing
        // North].

        relative_x = x - screen_width / 2
        relative_y = screen_height / 2 - y

        // Next, we check to see if y is zero to trap
        // any divide-by-zero errors:
        if relative_y = 0 then
            if relative_x < 0 then
                angle = -90
            else
                angle = 90
            end if
        else
             // y is not zero, so use atan (tan-1) to
             // calculate the angle.
            angle = atan(relative_x/relative_y)
        end if

        // Finally, check to see if we're in the
        // bottom half, and if so, fix the angle.
        if relative_y > 0 then
            angle = angle + 180
        end if

        // Last of all, save the angle to our table.
        angle_lut(x,y) = angle

    next x
next y
When implementing the code for real, there are some things you need to look out for:
- Trigonometric functions will not usually return values in degrees. You will need to translate them. In fact, rather than use degrees, it makes makes much more sense to use values that can be used directly with your texture. For example, if your texture was 256x256 pixels (a good size for a 512x512 window), then use 0°=0, 90°=64, 180°=128 and 359°=255. A conversion function for those values would be:
translated_angle = angle_in_radians / (2 * π) * texture_size
where π is the mathematical constant 3.141592... - If memory is at a premium, the fact that the bottom half of the lookup table is a mirror of the top half could be used to save space at the cost of more processing later in the code by only building a half-size table and performing the mirroring later or to cut down on the amount of floating-point operations by only calculating the top half using the atan function then to use simple integer-based maths to fill the bottom half. In fact, the very nature of the LUT means that you could also quarter it, or even (which is where things start to get messy) eighth it.
Once you have set up the angle table, it is a very simple job to test it (and I believe in checking as I go along!) Write some code that cycles through each pixel, gets the corresponding value from the angle table and sets the pixel a colour based on that value. If your "angles" are in the range 0-255, you can write that pixel value directly - you should see a radial pattern. You could even use those pixel values to read as an x-value from your texture, and you should be able to read in the top row of pixels as a radial pattern.
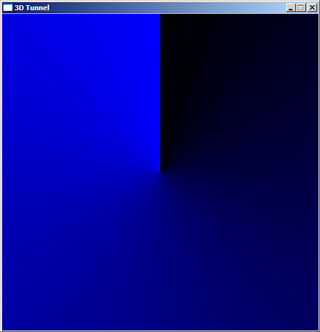
Here is the result of such a test - the display is blue as I was writing to a 32-bit surface where the least significant byte (0-255) represents the blue component of a colour. If your results don't quite look like this, don't panic:
- If the top half looks fine but the bottom half looks weird (or vice-versa), make sure that your check to see if y<0 and the corresponding adjustment is correct.
- If you get a bright stripe where you need a dark stripe (and vice-versa) at the +90° and -90° points, swap the x<0 for an x>0 at the point where you check to see if y is zero to avoid divide-by-zero errors.
- If the result is blocky and not smooth make sure that you are casting up to floats or doubles before passing data to the trigonometric functions or functions to translate the angle to a texture coordinate.
Now, take a breather - you're half-way there!
Calculating the depth
The y-coordinate of the texture is based on the depth to the pixel on the screen. This is easier code-wise to calculate, but isn't as immediately obvious maths-wise.
Essentially, you take a big number (such as the texture width) and divide it by the distance squared in the plane of screen to each pixel from the centre. That no doubt sounds a bit confusing - what I mean, really, is that the depth is:
depth = big_number / (x2+y2)
We then plug that depth value straight in as the y-coordinate of the texture. For a 512x512 pixel display, a "big_number" of 8388608 (223) appears to work as a "sensible" value. The sample pseudo-code shows how easy this stage is:
for y is 0 to screen_height - 1
    for x is 0 to screen_width - 1

        relative_x = x - screen_width / 2
        relative_y = screen_height / 2 - y

        depth = 8388608 / (relative_x^2 + relative_y^2)

        depth_lut(x,y) = depth

    next x
next y
Test this stage in the same way as you did for the angle table - make sure that you keep the value in the range for your pixel-plotter though! (The values should be positive, so in a C-type language you can just use the % operator to keep it valid).
You should end up with something like the above image. You will no doubt notice the horrible moiré patterns in the distance - we'll fix those later. As before, the major problem here is going to be casting to and from integers and doubles/floats. Keeping everything in floating-point maths until the final cast into our lookup tables is a good plan - after all, it's just a one-off batch of calculations at the start of the program!
Texturing
Well, we've got some nifty blue swirls going on here (or whatever test system you implemented), but it's not helping our texturemapped tunnel much. In fact, applying the texture is now very simple! For each pixel, take the value for the angle from the table and use that as the x-coordinate for the texture lookup, and use the value from the depth table as the y-coordinate for the texture lookup. Essentially, this:
for y is 0 to screen_height - 1
    for x is 0 to screen_width - 1

        // Look up the coordinates to read from the
        // texture:

        texture_x = angle_lut(x,y)
        texture_y = depth_lut(x,y)

        // Fix the values so they are in range
        // of the texture:

        while x < 0 : x = x + texture_width : loop
        while y < 0 : y = y + texture_height : loop

        while x > texture_width : x = x - texture_width : loop
        while y > texture_height : y = y - texture_height : loop

        // Set the screen pixel:

        set_screen_pixel(x,y) = texture(texture_x,texture_y)

    next x
next y
...where we are treating the texture as an array of colour values. If you run that, you should see your texture applied neatly to the wall! One thing that does look a bit odd is that the texture only wraps around the wall's circumference once, but is quite short along the length of the tunnel. To fix this, multiply the calculated angle by the number of times you want the texture to repeat around the perimeter when building the angles lookup table.
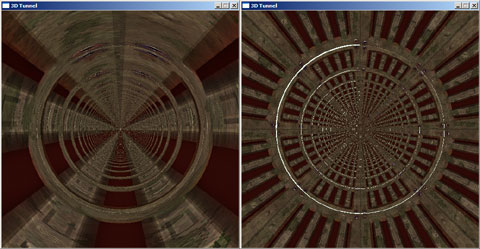
The above image shows the difference between using the normal angle in the range 0 to 255, the second shows the result of multiplying it by eight before saving it to the angle lookup table.
Animating the tunnel
It's one thing to have a static tunnel, and quite another to have a tunnel that you move along! How do you animate the tunnel, then?
The answer is incredibly simple. Once you have taken your texture_x and texture_y values from the two lookup tables, add the rotation value and the amount you want to move down the tunnel to them respectively.
while prog_is_running
    for y is 0 to screen_height - 1
        for x is 0 to screen_width - 1

            // Look up the coordinates to read from the
            // texture:

            texture_x = angle_lut(x,y) + tunnel_rotated
            texture_y = depth_lut(x,y) + tunnel_zoomed

            // Fix the values so they are in range
            // of the texture:

            while x < 0 : x = x + texture_width : loop
            while y < 0 : y = y + texture_height : loop

            while x > texture_width : x = x - texture_width : loop
            while y > texture_height : y = y - texture_height : loop

            // Set the screen pixel:

            set_screen_pixel(x,y) = texture(texture_x,texture_y)

        next x
    next y

    tunnel_zoomed = tunnel_zoomed + 1
    tunnel_rotated = tunnel_rotated + 1
loop
(Unchanged code is shown in pale grey). Now, there is one thing that you might have noticed - and that's that the rotation and zooming in are not very smooth. That's because we're using integers to hold the values in the lookup tables. They might be very fast, yes, but rather limiting. The trick here is to use fixed point maths, which basically means that when we calculate our lookup tables we multiply the values by a large number, then divide again by that number before looking up that value on the texture. How does this work?
Let's say our angle ranges from 0 to 255 again. If we were to multiply this by 256, it now ranges from 0 to 65535 (assuming you multiply by the large constant factor before casting to an integer - if you multiply afterwards, you don't gain any precision). Now, when you add the rotation (tunnel_rotated in the above example) it is only worth 1/256th of what it had been - we can now rotate our tunnel with a lot more precision. Of course, these values are too big to use directly, so we divide by 256 again to make them usable.
It's a good idea to choose a power-of-two number (2i, such as 2, 4, 8, 16, 32, 64, 128, and so on) as we can perform the division by bit-shifting, which is a very fast way to divide integers.
Looking around
If you look at the screenshot right at the top of the page, you'll see that the view is not dead on. In fact, we almost appear to moving around and looking at the inside the tunnel... how have I done that?
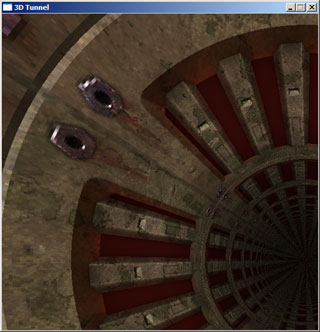
If you have ever seen Duke Nukem 3D's faked mouselook (DOOM only let you look left and right, Duke Nukem 3D let you look up and down a little as well) you'll know that the effect isn't perfect - it seems to just stretch the view up or down. In fact, it's even lower tech than that - as you look up or down, it just scrolls the rendered area up or down!
This effect is how we can make our tunnel more interesting. Make your lookup tables twice the width and twice the height of the screen area, but calculate the values in exactly the same way. Well, almost - when calculating the relative_x and relative_y, do not subtract half the screen width (or height), but half the lookup table width (or height) instead. If you run your program now, you should just have the top-left part of your tunnel (similar to the screenshot just above) rendered. To look around, add an x-offset and a y-offset to the (x,y) values used to read values from the lookup tables. An x-offset of half the screen width and a y-offset of half the screen height should centre the tunnel again.
Removing the moiré
If you look at my screenshots of the finished tunnel, you'll notice that it gets darker in the middle as you get deeper into the tunnel. This has a number of effects - dropping the framerate, yes, but it also looks pretty cool and hides the ugly moiré effect in the distance.
How you decide to implement the effect is up to you. You have a depth table, so you could use that to scale the brightness of each pixel. However, I prefer to build a new surface in memory, set it to black and edit the alpha levels, so I can just blit it over the final image (shifted around and clipped to allow for "looking around") which takes advantage of the hardware blitting offered by your video card.
Troubleshooting tunnels
The simplicity of the programming involved means that the 3D tunnel effect can run on pretty much anything.
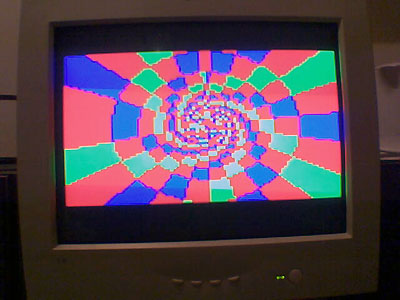
(The above image is a simple tunnel running on a Sony PS2, using YABASIC). However, the nature of the way you use them means that you can easily get confused, especially when you start using fixed-point maths. The speed comes from using precomputed lookup tables, and splitting the system in two (first, the maths in one section, and second, the rendering in another section) means that you have twice as many things to go wrong! Here are some hints, based on problems I've encountered (and ones I can see arising) when making tunnels:
- Make sure that you haven't done something silly when casting the floating-point numers to the integers in the generation of look-up tables. Try and keep the numbers in floats or doubles until the last moment!
- If using fixed point maths, make sure you multiply and divide by the same amount! If using shift operators (>>) to divide the number, make sure you are shifting it the right way and the right amount - >>8 is a divide by 256, not a divide by 8!
- Make sure you throttle the speed at which you move around/down the tunnel - if the walls are flickering like mad, maybe you are going down too fast!
- Ensure that you keep your texture coordinates between zero and the size of the texture. The % operator is fine for positive values, but can act oddly for negative values.
- Try and use power-of-two sizes where possible for simplicity and for speed of integer maths.