Calculating the angle
(Note that when I refer to x and y coordinates here, I refer to x as the axis pointing East and y as the axis pointing North).
Calculating the angle requires little more than a simple grasp of trigonometry. The basic formula for an angle given the x and y lengths are:
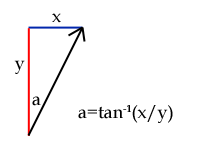
Well... almost. It's good enough for the -90° to 90° range at the top half of the screen. Think about it this way: if x=1 and y=1, the pixel would be 45° clockwise from North. Try that on a calculator, and you'll find that tan-1(1/1)=45° as you'd expect. Now, if x=-1 and y=-1, you'd think that the pixel would be 225° from North. However, tan-1(-1/-1)=45°. Ah. This is because 1/1 and -1/-1 both equal 1. How can you fix this, then? Well, it's very easy: all you have to do is check to see if the pixel lies in the bottom half of the screen: if y<0, it is in the bottom half. In this case, add 180° to the calculated angle.
You might have noticed one other problem - a nasty divide-by-zero error when y=0. This, again, is easy to remedy - check to see if x is less than 0. If it is, the angle is -90°, else the angle is 90°.
This entire process is best demonstrated with a bit of pseudo-code:
for y is 0 to screen_height - 1
    for x is 0 to screen_width - 1

        // First, we need to calculate the offset to
        // the pixel (the x,y coordinate relative to
        // the centre of the screen.
        // y is calculated "backwards" to x as screen
        // (x,y) are different to normal mathematical
        // (x,y) [on a screen, the y axis points South,
        // whereas we normally treat it as pointing
        // North].

        relative_x = x - screen_width / 2
        relative_y = screen_height / 2 - y

        // Next, we check to see if y is zero to trap
        // any divide-by-zero errors:
        if relative_y = 0 then
            if relative_x < 0 then
                angle = -90
            else
                angle = 90
            end if
        else
             // y is not zero, so use atan (tan-1) to
             // calculate the angle.
            angle = atan(relative_x/relative_y)
        end if

        // Finally, check to see if we're in the
        // bottom half, and if so, fix the angle.
        if relative_y > 0 then
            angle = angle + 180
        end if

        // Last of all, save the angle to our table.
        angle_lut(x,y) = angle

    next x
next y
When implementing the code for real, there are some things you need to look out for:
- Trigonometric functions will not usually return values in degrees. You will need to translate them. In fact, rather than use degrees, it makes makes much more sense to use values that can be used directly with your texture. For example, if your texture was 256x256 pixels (a good size for a 512x512 window), then use 0°=0, 90°=64, 180°=128 and 359°=255. A conversion function for those values would be:
translated_angle = angle_in_radians / (2 * π) * texture_size
where π is the mathematical constant 3.141592... - If memory is at a premium, the fact that the bottom half of the lookup table is a mirror of the top half could be used to save space at the cost of more processing later in the code by only building a half-size table and performing the mirroring later or to cut down on the amount of floating-point operations by only calculating the top half using the atan function then to use simple integer-based maths to fill the bottom half. In fact, the very nature of the LUT means that you could also quarter it, or even (which is where things start to get messy) eighth it.
Once you have set up the angle table, it is a very simple job to test it (and I believe in checking as I go along!) Write some code that cycles through each pixel, gets the corresponding value from the angle table and sets the pixel a colour based on that value. If your "angles" are in the range 0-255, you can write that pixel value directly - you should see a radial pattern. You could even use those pixel values to read as an x-value from your texture, and you should be able to read in the top row of pixels as a radial pattern.
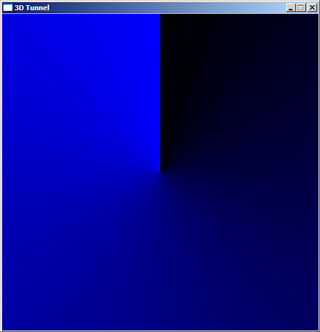
Here is the result of such a test - the display is blue as I was writing to a 32-bit surface where the least significant byte (0-255) represents the blue component of a colour. If your results don't quite look like this, don't panic:
- If the top half looks fine but the bottom half looks weird (or vice-versa), make sure that your check to see if y<0 and the corresponding adjustment is correct.
- If you get a bright stripe where you need a dark stripe (and vice-versa) at the +90° and -90° points, swap the x<0 for an x>0 at the point where you check to see if y is zero to avoid divide-by-zero errors.
- If the result is blocky and not smooth make sure that you are casting up to floats or doubles before passing data to the trigonometric functions or functions to translate the angle to a texture coordinate.
Now, take a breather - you're half-way there!