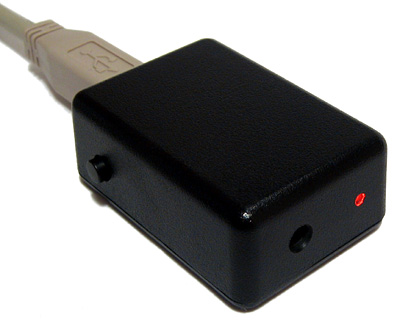
USB remote control receiver for PowerDVD
Monday, 7th June 2010
I enjoy watching films and mainly do so sitting at my desktop PC. This has taught me that cheap office chairs are not the most comfortable things to sit on for extended periods of time, especially when the next room contains a comfortable bean bag and a good place to stick a screen. A gap between the two rooms allows me to pass cables from one to the other, and after purchasing a 10m DVI-D cable and a USB extension lead on eBay I had both picture and sound sorted out (I use a USB sound "card"). This left me with one final problem: how to control the PC through a wall.
One possibility would be to extend the lead on my keyboard, but its media buttons light up (bothersome in a darkened room) and some of the keyboard shortcuts in PowerDVD (such as Ctrl+P for the popup menu when watching Blu-ray discs) are tricky to hit in the dark. Given my fondness for infra-red remote controls building a remote control receiver would seem like both an interesting and useful way to spend a weekend.
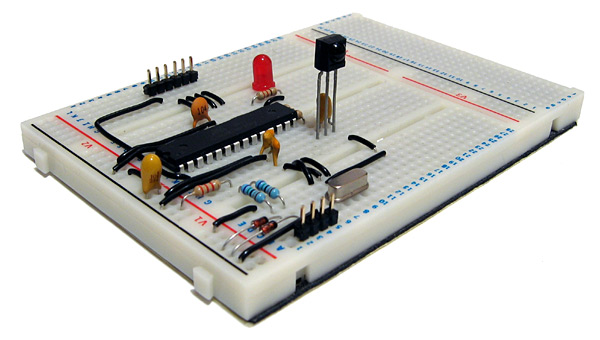
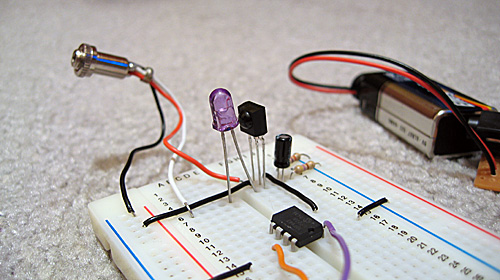
Rather than build something that relied on some Windows software to translate received remote control signals into keystrokes I decided to use the free V-USB library to construct something that showed up in Windows as a standard USB keyboard. One of the sample V-USB projects is a USB keyboard, which made getting started much easier! The above photograph shows the initial prototype, based around an ATmega168. The tall three-legged component sticking up out of the board is a TSOP2438, which is an infra-red receiver and demodulator. This is tuned to the 38kHz carrier employed by most remote controls and outputs a logic low or logic high depending on the presence or absence of such a signal. The ATmega168 is programmed to time the incoming signal and passes this timing information to a collection of routines that attempt to decode it. I have currently two decoders, one for the NEC protocol and another for SIRCS — information about some common protocols can be found on this website.
The choice of these two protocols is down to the remote controls I have around me. The one that offered me the most useful buttons was the PlayStation 2 DVD remote control (SIRCS), though this is missing some useful controls, such as volume and the red, green, yellow and blue buttons. To remedy this I went and bought a cheap universal remote control from Clas Ohlson. After hunting through several of the modes I settled on the Clas Ohlson DVD one (0815) as most of the buttons work in this mode (the only unshifted one that doesn't is the record button, and I can live without it). In this mode the remote control uses the NEC protocol.
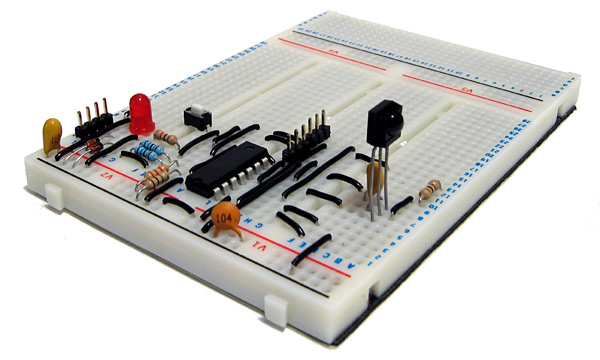
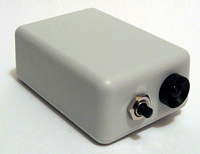
To turn the receiver into something more conveniently sized I decided to switch from the 28-pin ATmega168 to the 14-pin ATtiny84, shown in the above photograph. The compiled program was already small enough to fit into the reduced memory, and the only modification I had to make was to amend two timing routines to share the same timer peripheral as the ATtiny84 only has two timers, not the three I'd been using on the ATmega168.
I also opted to add a switch to the design. One problem with supporting both Blu-ray and DVD is that the way you navigate menus is quite different between the two; Blu-ray discs use a simple popup menu (Ctrl+P) which appears on top of the film, whereas DVDs seem to offer a number of different menu commands — the two most common ones being "Title menu" (no shortcut) and "Root menu" (J). PowerDVD also lets you choose from a list of DVD menus in a context menu with one shortcut (L). I set the button on the receiver to switch between "Blu-ray" and "DVD" modes; in Blu-ray mode, the menu button sends Ctrl+P and in DVD mode the menu button sends L.
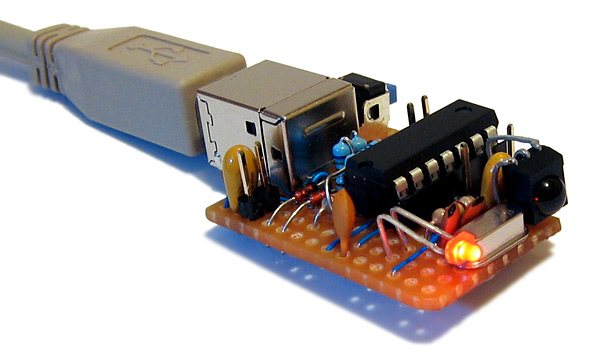
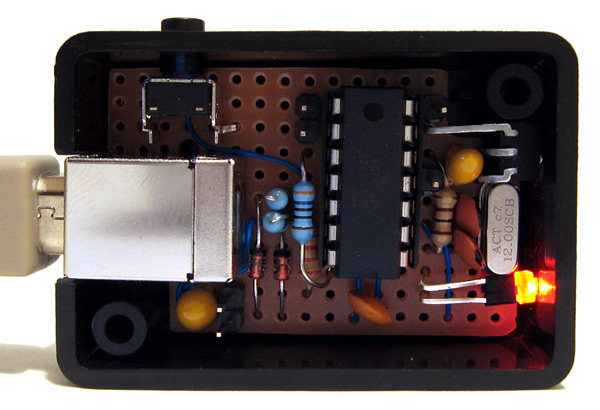
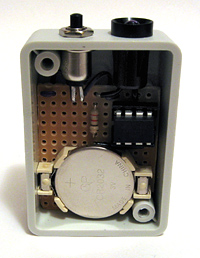
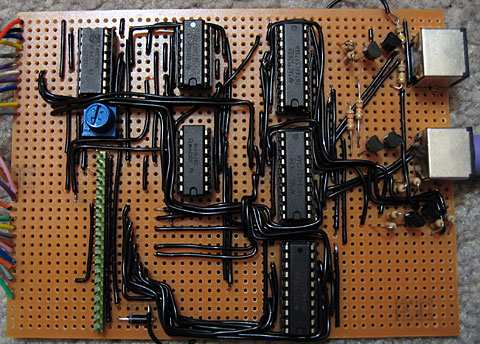
I bought an enclosure that is, in retrospect, a little too small. The above photograph shows the receiver assembled on stripboard with a fairly cramped layout. Fortunately there was sufficient room to include pin headers on the board, which will allow me to plug in a programmer to modify the software should I need to in the future. The LED on the front serves as simple user feedback — it flashes whenever it receives a valid command and sends a keystroke back to the PC. When the mode is toggled between Blu-ray and DVD menus it flashes to indicate the new mode — a long flash followed by a single short one for Blu-ray, a long flash followed by two short ones for DVD.
Overall, I'm quite happy with the way it turned out. It works well enough for my needs, though as those needs only extend as far as PowerDVD and a particular remote control it's rather basic and much more could be done with the hardware. I have uploaded the source code and a schematic for the project to my website as it currently stands for those who are interested.
Ejecting discs from a damaged camcorder with a remote control
Tuesday, 29th December 2009
I hope that those of you who celebrate it had a good Christmas break and will have an excellent new year!
I recently attempted to repair a DVD camcorder that had been dropped; the eject button no longer worked, though the disc could be ejected by connecting to camera to a PC, right-clicking the DVD drive that subsequently appears in Explorer, then selecting Eject.
I started by removing all of the screws around the affected area, but the plastic casing remained strongly held together by some mysterious internal force. I removed more and more screws, but it soon became apparent that the only way to get into the camera would be to force it open – not being my camera, I didn't feel comfortable doing so, as the rest of the camera worked well and I didn't want to damage any fragile internal mechanisms. I couldn't find any dismantling guides online, so gave up on the idea of fixing the button.
Fortunately, I own the same model of camcorder – a Panasonic VDR-D250 – myself. With my interest in infrared remote controls I had previously found information about the Panasonic protocol it uses. The supplied remote control only has a few simple buttons on it (no eject button, sadly), but I reckoned that the camcorder may accept a number of other commands that the stock remote didn't include.
I started by modifying a universal remote control program for the TI-83+ that I had previous written to allow me to send specific commands to the camcorder, then ran through all of the possible command IDs, noting down those that appeared to have some effect. Eventually I had a pretty decent list, albeit one with quite a few gaps in it. Fortunately, I had found the Eject button code, along with codes to switch mode (which is done on the camera by rotating a mode dial), one that powers the camcorder off, another that appears to restart the camera and another one that resets all settings (not so useful, that one).
Having found the eject code, I set about building a dedicated remote control. I picked the ATtiny13 microcontroller as a base, as that's a more than capable microcontroller with its 9.6MHz internal clock, 1KB program memory, 64 bytes SRAM and 3V operation.
I was a bit surprised to see that AVR-GCC supports the ATtiny13, and whilst C may seem overkill for such a project I'll gladly take advantage of anything that makes my life easier. 
// Requisite header files.
#include <avr/io.h>
#include <util/delay.h>

// Frequency of the IR carrier signal (Hertz).
#define F_IR_CARRIER (37000)

// Timing of the data bits (microseconds).
#define T_DX_MARK   (440)
#define T_D0_SPACE  (440)
#define T_D1_SPACE (1310)

// Timing of the lead-in and lead-out bits (microseconds).
#define T_LEAD_IN_MARK    (3500)
#define T_LEAD_IN_SPACE   (1750)
#define T_LEAD_OUT_MARK    (440)
#define T_LEAD_OUT_SPACE (74000)

// Commands definitions.
#define OEM_DEVICE_1_CODE         (2)
#define OEM_DEVICE_2_CODE        (32)
#define CAMCORDER_DEVICE_ID     (112)
#define CAMCORDER_SUB_DEVICE_ID  (40)
#define CAMCORDER_COMMAND_EJECT   (1)

// Transmits a single unformatted byte.
void panasonic_send_byte(uint8_t value) {
    // Send eight data bits.
    for (uint8_t bit = 0; bit < 8; ++bit, value >>= 1) {
        // Send the mark/burst.
        DDRB |= _BV(1);
        _delay_us(T_DX_MARK);
        // Send the space.
        DDRB &= (uint8_t)~_BV(1);
        _delay_us(T_D0_SPACE);
        // Extend the space if it's a "1" data bit.
        if (value & (uint8_t)1) {
            _delay_us(T_D1_SPACE - T_D0_SPACE);
        }
    }
}

// Transmits a formatted command packet to the IR device.
void panasonic_send_command(uint8_t oem_device_code_1, uint8_t oem_device_code_2, uint8_t device_code, uint8_t sub_device_code, uint8_t command) {
    // Send the lead in.
    DDRB |= _BV(1);
    _delay_us(T_LEAD_IN_MARK);
    DDRB &= (uint8_t)~_BV(1);
    _delay_us(T_LEAD_IN_SPACE);

    // Send the five command bytes.
    panasonic_send_byte(oem_device_code_1);
    panasonic_send_byte(oem_device_code_2);
    panasonic_send_byte(device_code);
    panasonic_send_byte(sub_device_code);
    panasonic_send_byte(command);

    // Send the checksum.
    panasonic_send_byte(device_code ^ sub_device_code ^ command);

    // Send the lead out.
    DDRB |= _BV(1);
    _delay_us(T_LEAD_OUT_MARK);
    DDRB &= (uint8_t)~_BV(1);
    _delay_us(T_LEAD_OUT_SPACE);
}

// Main program entry point.
int main(void) {

    TCCR0A |= _BV(COM0B0) | _BV(WGM01);     // Toggle OC0B when on CTC reload. Use CTC mode.
    TCCR0B |= _BV(CS00);                    // Set clock source to CPU clock/1.
    OCR0A = (F_CPU / F_IR_CARRIER / 2) - 1; // Set the CTC reload value to generate an IR signal at the correct carrier frequency.

    // Send the "eject" command ad infinitum.
    for(;;) {
        panasonic_send_command(OEM_DEVICE_1_CODE, OEM_DEVICE_2_CODE, CAMCORDER_DEVICE_ID, CAMCORDER_SUB_DEVICE_ID, CAMCORDER_COMMAND_EJECT);
    }
}
The code is about as simple as the circuit. IR signals are transmitted as carefully timed bursts of a particular carrier frequency (37kHz in this case). For example, to send a "0" bit 440μS of this 37kHz signal are sent followed by 440μS of silence. To send a "1" bit, 440μS of carrier signal are sent as before, but a 1310μS period of silence follows it.
The AVR's timer is used to generate a ~37kHz carrier signal. The timer is an eight-bit counter that counts up at a user-defined rate (in my case I've chosen to increment the counter by one every CPU clock cycle). I've configured it to invert the output level of pin OC0B and reset every time it hits a particular value. By setting whether this pin is an output or an input the output of a burst of 37kHz IR signal or silence can be selected. Simple delay loops, generated with the helper function _delay_us, are used to time the transmission of data bits.
The final step was to assemble the circuit on stripboard and install it in a smallish project box. I've put the switch adjacent to the LED for two reasons; to conserve space and to protect it a little from accidentally being pressed by the protruding LED bezel.
Building a single-button remote control is a relatively straightforward affair, so whilst the above code has a very specific purpose it should be easy enough to modify it to control other devices.
RC-5, NEC, JVC and Panasonic infrared codes
Wednesday, 3rd June 2009
I've rewritten the remote control signal decoding software to handle multiple protocols. As well as SIRCS, it now supports RC-5, NEC, JVC and two Panasonic codes (one "old" 11-bit code and one "new" 48-bit code). There's not much in the way of screenshots at the moment, other than a debug window that gets filled when keys are pressed:
NecCommand Address=24, Command=87, Extended=False, Repeat=1
RC5Command Address=20, Command=53, Repeat=True, Repeat=1
NewPanasonicCommand OEM Device 1=2, OEM Device 2=32, Device=144, Sub-Device=0, Command=10, Repeat=1
RC5Command Address=8, Command=35, Repeat=True, Repeat=1
OldPanasonicCommand Address=0, Command=20, Repeat=1
SircsCommand Address=2362, Command=121, Length=20, Repeat=1
SircsCommand Address=7002, Command=84, Length=20, Repeat=1
NecCommand Address=64, Command=146, Extended=False, Repeat=1
NecCommand Address=81, Command=8, Extended=False, Repeat=1
JvcCommand Address=3, Command=23, Repeat=1
Gripping stuff, I'm sure you'll agree.
The C# source code for this can be downloaded here.
A keyring remote control (courtesy of Poundland) has highlighted one possible issue in handling repeating buttons. Rather than target any particular device, it will try and brute-force a response. For example, here's the result of pressing the power button once in one particular mode:
SircsCommand Address=1, Command=21, Length=12, Repeat=2
OldPanasonicCommand Address=0, Command=32, Repeat=1
NecCommand Address=32, Command=11, Extended=False, Repeat=1
NewPanasonicCommand OEM Device 1=2, OEM Device 2=32, Device=128, Sub-Device=0, Command=61, Repeat=1
That's four different protocols from one button. I suppose some sort of mapping from protocol-specific code to a string (so those five commands would be translated into five "power" strings) and comparing the time between signals to turn the input into something meaningful may help, but that would require an enormous database of known codes.
Remote controlling Windows the Sony way
Wednesday, 27th May 2009
It's been a while since I last posted, and unfortunately this post is to do with Sony remote controls again. 
This time I'm attempting to use Sony (or compatible) remote controls to control software running on a Windows PC. I've recently been watching more films in PowerDVD, and some of the keyboard shortcuts (eg Ctrl+P for the menu) are a little difficult to hit in the dark and from a distance. I have a ready supply of universal remote controls as well as the PlayStation 2 DVD remote control, all of which work with the SIRCS protocol.
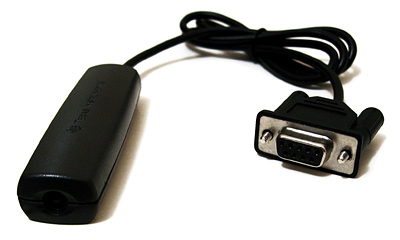
Serial port infra-red receiver built into an old TI GraphLink cable
First up is the required hardware. This involves an infrared demodulator connected to a free serial port. I chose the serial port as .NET provides a way to handle pin change events and you do not need administrator rights to access it (as per the parallel port). I also had a broken Texas Instruments GraphLink cable that could be ripped apart to act as a case.
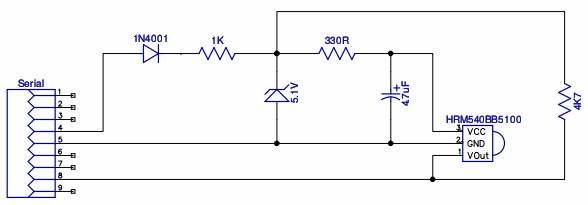
Infra-red receiver module schematic
The circuit is pretty simple. Pin 4 (DTR) and 5 (GND) from the serial port form the power supply. DTR can be set to either +12V or -12V, so a rectifier diode is used to keep the input voltage above 0V. Following that is a reverse-biased zener diode and resistor to regulate the voltage below 5.1V. Finally, the output pin of the infra-red demodulator is connected to the input pin 8 (CTS) of the serial port.
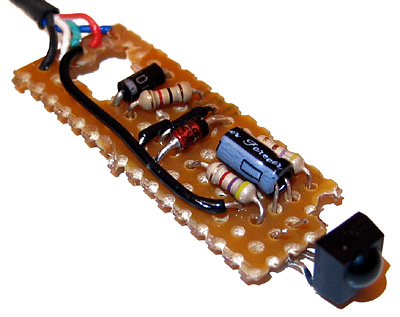
Infra-red receiver module assembled on stripboard
The software handles the SerialPort.PinChanged event to time the length of input pulses. Once it detects a start bit (2.4mS) it starts decoding the rest of the command. When it's finished receiving a command it fires an event of its own, which the main software can react to.
using System;
using System.Diagnostics;
using System.IO.Ports;

namespace BeeDevelopment.Sircs {

    /// <summary>
    /// Represents a command sent by a SIRCS remote control.
    /// </summary>
    public struct SircsCommand : IEquatable<SircsCommand> {

        #region Properties

        private byte command;
        /// <summary>
        /// Gets or sets the command value.
        /// </summary>
        public byte Command {
            get { return this.command; }
            set { this.command = value; }
        }

        private short device;
        /// <summary>
        /// Gets or sets the device identifier.
        /// </summary>
        public short Device {
            get { return this.device; }
            set { this.device = value; }
        }

        private int length;
        /// <summary>
        /// Gets or sets the length of the command in bits.
        /// </summary>
        public int Length {
            get { return this.length; }
            set { this.length = value; }
        }

        #endregion

        #region Construction

        /// <summary>
        /// Creates an instance of a <see cref="SircsCommand"/> structure.
        /// </summary>
        /// <param name="command">The command value.</param>
        /// <param name="device">The device identifier.</param>
        /// <param name="length">The length of the command in bits.</param>
        public SircsCommand(byte command, short device, int length) {
            this.command = command;
            this.device = device;
            this.length = length;
        }

        #endregion

        #region Methods

        /// <summary>
        /// Converts the <see cref="SircsCommand"/> into a string.
        /// </summary>
        /// <returns>A string representation of the <see cref="SircsCommand"/>.</returns>
        public override string ToString() {
            return string.Format("Command={0:X2}, Device={1:X4}, Length={2}", this.command, this.device, this.length);
        }

        /// <summary>
        /// Returns the hash code for this instance.
        /// </summary>
        /// <returns>The hash code for this instance.</returns>
        public override int GetHashCode() {
            return this.command ^ this.device ^ this.length;
        }

        /// <summary>
        /// Returns a value indicating whether this instance is equal to another <see cref="SircsCommand"/> instance.
        /// </summary>
        /// <param name="other">The instance to compare to this one for equality.</param>
        /// <returns>True if the instances are equal, false otherwise.</returns>
        public bool Equals(SircsCommand other) {
            return this.command == other.command && this.device == other.device && this.length == other.length;
        }

        /// <summary>
        /// Returns a value indicating whether this instance is equal to another <see cref="SircsCommand"/> instance.
        /// </summary>
        /// <param name="other">The instance to compare to this one for equality.</param>
        /// <returns>True if the instances are equal, false otherwise.</returns>
        public override bool Equals(object other) {
            return other != null && other is SircsCommand && ((SircsCommand)other).Equals(this);
        }

        #endregion

        #region Operators

        public static bool operator ==(SircsCommand a, SircsCommand b) { return a.Equals(b); }
        public static bool operator !=(SircsCommand a, SircsCommand b) { return !a.Equals(b); }

        #endregion

    }

    #region Events

    /// <summary>
    /// Represents the method that will handle the <c>SircsCommandReceived</c> event.
    /// </summary>
    /// <param name="sender">The object that fired the event.</param>
    /// <param name="e">Information about the event.</param>
    public delegate void SircsCommandReceivedEventHandler(object sender, SircsCommandReceivedEventArgs e);

    /// <summary>
    /// Provides data for the <c>SircsReceived.SircsCommandReceived</c> event.
    /// </summary>
    public class SircsCommandReceivedEventArgs : EventArgs {

        #region Properties

        /// <summary>
        /// Gets the <see cref="SircsCommand"/> that was received.
        /// </summary>
        public SircsCommand Command { get; private set; }

        /// <summary>
        /// Gets the number of times that the incoming command has been repeated when held.
        /// </summary>
        public int Repeat { get; private set; }

        #endregion

        #region Construction

        /// <summary>
        /// Creates a <see cref="SircsCommandReceivedEventArgs"/> instance.
        /// </summary>
        /// <param name="command">The <see cref="SircsCommand"/> that was recieved.</param>
        /// <param name="repeat">The number of times that the incoming command has been repeated when held.</param>
        public SircsCommandReceivedEventArgs(SircsCommand command, int repeat) {
            this.Command = command;
            this.Repeat = repeat;
        }

        #endregion

        #region Methods

        /// <summary>
        /// Converts the <see cref="SircsCommandReceivedEventArgs"/> into a string.
        /// </summary>
        /// <returns>A string representation of the <see cref="SircsCommandReceivedEventArgs"/>.</returns>
        public override string ToString() {
            return string.Format("{0}, Repeat={1}", this.Command, this.Repeat);
        }

        #endregion
    }

    #endregion

    /// <summary>
    /// Provides a way to receive SIRCS commands from a simple receiver attached to a serial port.
    /// </summary>
    public class SircsReceiver : IDisposable {

        #region Constants

        /// <summary>
        /// The minimum time length for a start bit (nominally 2.4ms).
        /// </summary>
        private const double StartBitMinLength = 2.0E-3;

        /// <summary>
        /// Threshold time length between a "low" (0.6ms) and a "high" (1.2ms) bit.
        /// </summary>
        private const double DataBitLengthThreshold = 0.9E-3;

        /// <summary>
        /// The maximum time length between data bits. If this is exceeded, any data command transfer is cancelled.
        /// </summary>
        private const double IntraBitMaxLength = 0.8E-3;

        /// <summary>
        /// The maximum time length between repeating commands. Commands are supposed to repeat every 45ms.
        /// </summary>
        private const double RepeatCommandMaxLength = 120.0E-3;

        #endregion

        #region Private Fields

        /// <summary>
        /// The <see cref="SerialPort"/> that the receiver is connected to.
        /// </summary>
        private SerialPort Port = null;

        /// <summary>
        /// The last time that the pin state changed in ticks.
        /// </summary>
        private long LastPinChangedTime = 0;

        /// <summary>
        /// A <see cref="Stopwatch"/> instance used to time incoming bits.
        /// </summary>
        private Stopwatch BitTimer = null;

        /// <summary>
        /// Set to <c>true</c> when receiving a command, <c>false</c> otherwise.
        /// </summary>
        private bool ReceivingCommand = false;

        /// <summary>
        /// Counts the number of bits currently received.
        /// </summary>
        private int BitsReceived = 0;

        /// <summary>
        /// Stores the command as it gets built up.
        /// </summary>
        private uint Command = 0;

        /// <summary>
        /// Stores the last received command.
        /// </summary>
        private SircsCommand LastCommand = default(SircsCommand);

        /// <summary>
        /// Stores the number of times the received command has been repeated.
        /// </summary>
        private int LastCommandRepeatCount = 0;

        /// <summary>
        /// A <see cref="Stopwatch"/> instance used to time repeating commands.
        /// </summary>
        private Stopwatch RepeatTimer = null;

        #endregion

        #region Construction/Destruction

        /// <summary>
        /// Creates an instance of a <see cref="SircsReceiver"/> from a serial port name.
        /// </summary>
        /// <param name="portName">The name of the serial port the receiver is connected to.</param>
        public SircsReceiver(string portName) {

            // Set up the serial port.
            this.Port = new SerialPort(portName);
            this.Port.PinChanged += new SerialPinChangedEventHandler(PinChanged);

            // Open the port for access.
            this.Port.Open();
            this.Port.DtrEnable = true;
            this.Port.RtsEnable = true;

            // Get the timers running.
            this.BitTimer = new Stopwatch();
            this.BitTimer.Start();
            this.RepeatTimer = new Stopwatch();
            this.RepeatTimer.Start();
        }

        /// <summary>
        /// Releases the resources used by this <see cref="SircsReceiver"/> instance.
        /// </summary>
        public void Dispose() {
            if (this.Port != null) {
                this.Port.PinChanged -= new SerialPinChangedEventHandler(PinChanged);
                this.Port.Dispose();
                this.Port = null;
            }
        }

        ~SircsReceiver() {
            this.Dispose();
        }

        #endregion

        #region Events

        /// <summary>
        /// An event that is fired when a <see cref="SircsCommand"/> is received.
        /// </summary>
        public event SircsCommandReceivedEventHandler SircsCommandReceived;

        /// <summary>
        /// A method that is invoked when a <see cref="SircsCommand"/> is received.
        /// </summary>
        /// <param name="e"></param>
        protected virtual void OnSircsCommandReceived(SircsCommandReceivedEventArgs e) {
            if (this.SircsCommandReceived != null) this.SircsCommandReceived(this, e);
        }

        #endregion

        #region SIRCS protocol handling

        void PinChanged(object sender, SerialPinChangedEventArgs e) {

            // Respond to changes on the CTS pin.
            if (e.EventType == SerialPinChange.CtsChanged) {

                // Quickly grab the current time and current CTS level.
                long CurrentPinChangedTime = this.BitTimer.ElapsedTicks;
                bool CurrentLevel = this.Port.CtsHolding;

                // Calculate the time elapsed.
                long DeltaTime = CurrentPinChangedTime - this.LastPinChangedTime;
                double SecondsElapsed = (double)DeltaTime / (double)Stopwatch.Frequency;
                this.LastPinChangedTime = CurrentPinChangedTime;

                if (CurrentLevel) { // If the current signal level is high, we may assume that we've just timed a low pulse.

                    // Have we received a start bit?
                    if (SecondsElapsed > SircsReceiver.StartBitMinLength) {
                        this.ReceivingCommand = true;
                        this.BitsReceived = 0;
                        this.Command = 0;
                    } else if (this.ReceivingCommand) {
                        // Process incoming bit.
                        this.Command >>= 1;
                        if (SecondsElapsed > SircsReceiver.DataBitLengthThreshold) {
                            this.Command |= unchecked((uint)(1 << 31));
                        }

                        // Have we received enough bits?
                        switch (++this.BitsReceived) {
                            case 12:
                            case 15:
                            case 20:
                                // We've received enough bits to handle the input as a received command.
                                // Check to see if there's any more data forthcoming.
                                long EndTime = CurrentPinChangedTime + (long)(Stopwatch.Frequency * SircsReceiver.IntraBitMaxLength);
                                while (BitTimer.ElapsedTicks < EndTime) {
                                    if (!(CurrentLevel = this.Port.CtsHolding)) break;
                                }
                                // The input is still high - there's no more data coming in; we've received a command.
                                if (CurrentLevel) {
                                    // Construct a struct to hold information about the recieved data.
                                    SircsCommand ReceivedCommand = new SircsCommand(
                                        (byte)((this.Command >> (32 - this.BitsReceived)) & 0x7F),
                                        (short)(this.Command >> ((32 + 7) - this.BitsReceived)),
                                        this.BitsReceived
                                    );

                                    // Reset the timer.
                                    this.ReceivingCommand = false;
                                    this.BitTimer.Reset();
                                    this.BitTimer.Start();
                                    this.LastPinChangedTime = 0;

                                    // Calculate the repeat count.

                                    // Quickly grab the current time and current CTS level.
                                    long RepeatTimeTicks = this.RepeatTimer.ElapsedTicks;
                                    this.RepeatTimer.Reset();
                                    this.RepeatTimer.Start();

                                    // Calculate the repeat time elapsed.
                                    double RepeatTimeSeconds = (double)RepeatTimeTicks / (double)Stopwatch.Frequency;

                                    // Is the command repeating?
                                    if (ReceivedCommand == this.LastCommand && RepeatTimeSeconds < SircsReceiver.RepeatCommandMaxLength) {
                                        ++this.LastCommandRepeatCount;
                                    } else {
                                        this.LastCommandRepeatCount = 1;
                                        this.LastCommand = ReceivedCommand;
                                    }

                                    // Fire the event.
                                    this.OnSircsCommandReceived(new SircsCommandReceivedEventArgs(ReceivedCommand, this.LastCommandRepeatCount));
                                }
                                break;
                        }
                    }
                } else { // If the current signal level is low, we may assume that we've just timed a high pulse.
                    // If a high pulse is too long, cancel any incoming commands.
                    if (SecondsElapsed > SircsReceiver.IntraBitMaxLength) {
                        this.ReceivingCommand = false;
                        this.BitTimer.Reset();
                        this.BitTimer.Start();
                        this.LastPinChangedTime = 0;
                    }
                }
            }
        }

        #endregion

    }
}
Currently, the software reacts to input events by running through a list of scripts, passing the command ID, device ID and command length (in bits) to each until one of them returns zero (ie, success) to indicate that it has processed the button.
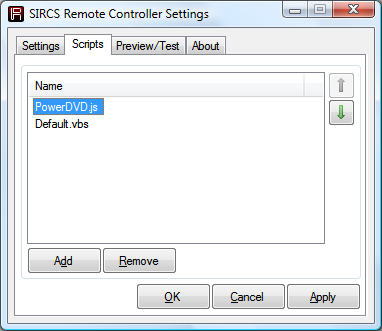
Scripts list
The advantage to this method is that the end-user could customise the behaviour of the software to their own liking very easily. For example, here's the PowerDVD.js file from above, which allows me to control PowerDVD from a PlayStation 2 DVD remote control:
// Table of commands.
var Commands = [
    { Command : 0x00, Device : 0x093A, Length : 20, Shortcut : '1' },         // 1
    { Command : 0x01, Device : 0x093A, Length : 20, Shortcut : '2' },         // 2
    { Command : 0x02, Device : 0x093A, Length : 20, Shortcut : '3' },         // 3
    { Command : 0x03, Device : 0x093A, Length : 20, Shortcut : '4' },         // 4
    { Command : 0x04, Device : 0x093A, Length : 20, Shortcut : '5' },         // 5
    { Command : 0x05, Device : 0x093A, Length : 20, Shortcut : '6' },         // 6
    { Command : 0x06, Device : 0x093A, Length : 20, Shortcut : '7' },         // 7
    { Command : 0x07, Device : 0x093A, Length : 20, Shortcut : '8' },         // 8
    { Command : 0x08, Device : 0x093A, Length : 20, Shortcut : '9' },         // 9
    { Command : 0x09, Device : 0x093A, Length : 20, Shortcut : '0' },         // 0
    { Command : 0x0B, Device : 0x093A, Length : 20, Shortcut : '{ENTER}' },   // Enter
    { Command : 0x0E, Device : 0x093A, Length : 20, Shortcut : '{ESC}' },     // Return
    { Command : 0x1A, Device : 0x093A, Length : 20, Shortcut : 'lt' },        // Title
    { Command : 0x2A, Device : 0x093A, Length : 20, Shortcut : 'x' },         // A<->B
    { Command : 0x28, Device : 0x093A, Length : 20, Shortcut : 'd' },         // Time
    { Command : 0x2C, Device : 0x093A, Length : 20, Shortcut : '^r' },        // Repeat
    { Command : 0x30, Device : 0x093A, Length : 20, Shortcut : 'p' },         // Previous
    { Command : 0x31, Device : 0x093A, Length : 20, Shortcut : 'n' },         // Next
    { Command : 0x32, Device : 0x093A, Length : 20, Shortcut : '{ENTER}' },   // Play
    { Command : 0x33, Device : 0x093A, Length : 20, Shortcut : 'b' },         // Scan <<
    { Command : 0x34, Device : 0x093A, Length : 20, Shortcut : 'f' },         // Scan >>
    { Command : 0x38, Device : 0x093A, Length : 20, Shortcut : 's' },         // Stop
    { Command : 0x39, Device : 0x093A, Length : 20, Shortcut : ' ' },         // Pause
    { Command : 0x54, Device : 0x093A, Length : 20, Shortcut : 'z' },         // Display
    { Command : 0x60, Device : 0x093A, Length : 20, Shortcut : '^b' },        // Slow <<
    { Command : 0x61, Device : 0x093A, Length : 20, Shortcut : 't' },         // Slow >>
    { Command : 0x63, Device : 0x093A, Length : 20, Shortcut : 'u' },         // Subtitle
    { Command : 0x64, Device : 0x093A, Length : 20, Shortcut : 'h' },         // Audio
    { Command : 0x65, Device : 0x093A, Length : 20, Shortcut : 'a' },         // Angle
    { Command : 0x79, Device : 0x093A, Length : 20, Shortcut : '{UP}' },      // Up
    { Command : 0x7A, Device : 0x093A, Length : 20, Shortcut : '{DOWN}' },    // Down
    { Command : 0x7B, Device : 0x093A, Length : 20, Shortcut : '{LEFT}' },    // Left
    { Command : 0x7C, Device : 0x093A, Length : 20, Shortcut : '{RIGHT}' },   // Right
];

// Search for the matching command.
var Command = null;
for (var enumerator = new Enumerator(Commands); !enumerator.atEnd(); enumerator.moveNext()) {
    var TestCommand = enumerator.item();
    if (TestCommand.Command == WScript.Arguments(1) && TestCommand.Device == WScript.Arguments(2) && TestCommand.Length == WScript.Arguments(3)) {
        Command = TestCommand;
        break;
    }
}

// No command.
if (!Command) WScript.Quit(1);

// Find the PowerDVD process ID.
var PowerDvdId = null;
var WmiService = GetObject('winmgmts://./root/cimv2');
var Processes = WmiService.ExecQuery('Select ProcessId From Win32_Process Where Name="PowerDVD.exe"');
for (var enumerator = new Enumerator(Processes); !enumerator.atEnd(); enumerator.moveNext()) {
    PowerDvdId = enumerator.item().ProcessId;
    break;
}

// If we haven't found the process ID, quit with an error.
if (!PowerDvdId) WScript.Quit(1);

// Activate the PowerDVD instance.
var WshShell = new ActiveXObject('WScript.Shell');
WshShell.AppActivate(PowerDvdId);

// Send the shortcut keys.
WshShell.SendKeys(Command.Shortcut);

WScript.Quit(0);
Unfortunately, this method has quite a lot of overhead. This becomes a problem when you consider that commands are repeated every 45ms. Currently I avoid the issue by not allowing any keys to repeat, but some keys - such as the volume keys - would need to repeat when held.
I'm unsure as the best path to take. One idea that has crossed my mind would be to set up each remote control you were going to use beforehand (though I suppose I could build up a database of remote controls and bundle them with the software). You could then set whether each key should repeat or not, and attach a meaningful string to each button. This would also allow for more protocols to be supported other than SIRCS, and you could set it up so that the Play button on a Sony remote control generated the string "play" and passed that to the script(s) as well as the Play button on a Panasonic or Toshiba remote control rather than juggling control codes.
Decoding SIRCS commands with a PIC16F84
Sunday, 1st March 2009
Some time ago I was working on a simple Z80-based computer. It has a PS/2 keyboard and mouse port for user input, and these are implemented using a large number of discrete parts - transistor drivers with all manner of supporting latches and buffers. The AT protocol (which the PS/2 keyboard and mouse inherit) is entirely implemented in software by the Z80.
On the one hand this design has a certain purity, but it ties the CPU up every time data is to be transferred. The keyboard sends data when it feels like it, so if you wished to perform some function based on a key press event you'd need to poll the port periodically, assuming that if communications time out there's no key waiting. All this hanging around does nothing good for performance.
As it turns out I found a PIC16F84 in an old school project over the weekend, so downloaded its datasheet and the MPLAB IDE and tried to puzzle it out.
The 16F84 is a pretty venerable microcontroller with a 1K flash memory for program code, 68 bytes of data RAM and 64 bytes of data EEPROM. It can run at up to 10MHz, and is based on a high-performance RISC CPU design. It has 13 digital I/O pins, each of which can be configured individually as either an input or an output. I'm well aware there are far better microcontrollers around these days, but this one was just sitting around doing nothing.
;if(img.style.backgroundImage){img.style.backgroundImage='url('+img.src+')';img.src=imgs[img.src.indexOf(imgs[1])<0?1:2]}else{img.style.backgroundImage='url('+img.src+')';img.src=imgs[2];};void(0);)
Above is the circuit I constructed to work with the 16F84. The HRM538BB5100 in the top-right is an infrared demodulator and amplifier module; it will output 5V until it receives a 38kHz infrared signal (such as the one emitted by most remote controls) at which point it outputs 0V. By timing the lengths of the IR pulses one could decode a remote control signal, and that's the aim of this project - decode a command from a Sony remote control and display it on the two 7-segment displays. The 10MHz crystal is probably overkill for this simple task, but it's the slowest I had available!
In fact, the 10MHz crystal works out quite neatly. Most instructions execute in one instruction cycle, which is four clock cycles. Four clock cycles at 10MHz is 400nS. The 16F84 has an internal timer that counts up after every instruction cycle and triggers an interrupt when it overflows from 255 back to 0; 400nS*256=102.4µs. If we call that 100µs (close enough for jazz) then it overflows 10 times every millisecond. The SIRCS protocol is based around multiples of 0.6ms, which makes this rate very easy to work with.
; ========================================================================== ;
; Pins:                                                                      ;
; RB0~RB6: Connected to A~G on the two seven-segment displays.               ;
; RB7:     Connected via a 220R resistor to cathode of the left display.     ;
;          Inverted and connected via a 220R resistor to right display's     ;
;          cathode.                                                          ;
; RA0:     Connected to the output of the HRM538BB5100.                      ;
; ========================================================================== ;

#include <p16F84.inc>

	list p=16F84

	__CONFIG   _CP_OFF & _WDT_OFF & _PWRTE_ON & _HS_OSC

; ========================================================================== ;
; Variables                                                                  ;
; ========================================================================== ;
	udata
IsrW       res 1 ; Temporary storage used to preserve state during the
IsrStatus  res 1 ; interrupt service routine.

Display    res 1 ; Value shown on 7-segment displays.

PulseTimer res 1 ; Counter to time the length of pulses.

BitCounter res 1 ; Number of bits being received.
Command    res 1 ; SIRCS command.

; ========================================================================== ;
; Reset                                                                      ;
; ========================================================================== ;
ResetVector code 0x0000
	goto Main

; ========================================================================== ;
; Interrupt Service Routine                                                  ;
; ========================================================================== ;
ISR code 0x0004

	; Preserve W and STATUS.
	movwf IsrW
	swapf STATUS,w
	movwf IsrStatus

	; Update value shown on two 7-segment displays.
	movfw Display
	btfsc PORTB,7
	swapf Display,w
	andlw h'F'
	call Get7SegBits
	btfss PORTB,7
	xorlw b'10000000'
	movwf PORTB

	; Increment pulse timer.
	incfsz PulseTimer,w
	movwf PulseTimer

	; Acknowledge timer interrupt.
	bcf INTCON,T0IF

	; Restore W and STATUS.
	swapf IsrStatus,w
	movwf STATUS
	swapf IsrW,f
	swapf IsrW,w
	retfie

; ========================================================================== ;
; Times the length of a "low" pulse.                                         ;
; ========================================================================== ;
; Out: W - Length of pulse.                                                  ;
; ========================================================================== ;
TimeLow
	clrf PulseTimer
TimeLow.Wait
	btfsc PORTA,0
	goto TimeLow.GoneHigh
	incfsz PulseTimer,w
	goto TimeLow.Wait
TimeLow.GoneHigh
	movfw PulseTimer
	return

; ========================================================================== ;
; Times the length of a "high" pulse.                                        ;
; ========================================================================== ;
; Out: W - Length of pulse.                                                  ;
; ========================================================================== ;
TimeHigh
	clrf PulseTimer
TimeHigh.Wait
	btfss PORTA,0
	goto TimeHigh.GoneLow
	incfsz PulseTimer,w
	goto TimeHigh.Wait
TimeHigh.GoneLow
	movfw PulseTimer
	return

; ========================================================================== ;
; Convert a hex nybble (0-F) into a format that can be displayed on a 7-seg  ;
; display.                                                                   ;
; ========================================================================== ;
; In: W. Out: W.                                                             ;
; ========================================================================== ;
Get7SegBits
	addwf PCL, f
	dt b'00111111' ; 0
	dt b'00000110' ; 1
	dt b'01011011' ; 2
	dt b'01001111' ; 3
	dt b'01100110' ; 4
	dt b'01101101' ; 5
	dt b'01111101' ; 6
	dt b'00000111' ; 7
	dt b'01111111' ; 8
	dt b'01101111' ; 9
	dt b'01110111' ; A
	dt b'01111100' ; b
	dt b'00111001' ; C
	dt b'01011110' ; d
	dt b'01111001' ; E
	dt b'01110001' ; F

; ========================================================================== ;
; Start of the main program.                                                 ;
; ========================================================================== ;
Main

	; Set PORTB to be an output.
	bsf STATUS,RP0
	clrw
	movwf TRISB
	bcf STATUS,RP0

	; Configure TMR0.
	bsf STATUS,RP0
	bcf OPTION_REG,T0CS ; Use internal instruction counter.
	bcf STATUS,RP0

	; Enable TMR0 interrupt.
	bsf INTCON,T0IE
	bsf INTCON,GIE

	clrf Display

; ========================================================================== ;
; Main program loop.                                                         ;
; ========================================================================== ;
Loop

WaitCommand
	; Loop around waiting for a low to indicate incoming data.
	btfsc PORTA,0
	goto WaitCommand

	; Start bit (2.4mS).
	call TimeLow
	; Check that it's > 2mS long.
	sublw d'20'
	btfsc STATUS,C
	goto WaitCommand ; w<=20

	; Reset the command variable and get ready to read 7 bits.
	clrf Command
	movlw d'7'
	movwf BitCounter

ReceiveBit
	; Time the pause; should be < 1mS.
	call TimeHigh
	sublw d'10'
	btfss STATUS,C
	goto WaitCommand

	; Time the input bit (0.6ms = low, 1.2ms = high).
	call TimeLow
	sublw d'9'
	; Shift into the command bit.
	rrf Command,f

	decfsz BitCounter,f
	goto ReceiveBit

	bsf STATUS,C
	rrf Command,f
	comf Command,f

	movfw Command
	movwf Display

	goto Loop

; ========================================================================== ;
; Fin.                                                                       ;
; ========================================================================== ;
	end
The final source code is above. I'm not sure how well-written it is, but it works; pointing a Sony remote control at the receiver and pressing a button changes the value shown on the seven-segment display. PICmicro assembly is going to get take a little getting used to; instructions are ordered "backwards" to the Intel order I'm used to (op source,destination instead of the more familiar op destination,source) and as far as I can tell literals default to being interpreted as hexadecimal as opposed to decimal.
With some luck I can now teach the 16F84 the AT protocol and replace a large number of parts on the Z80 computer project with a single IC. It does feel a little like cheating, though!
SonyIR
Monday, 30th April 2007
I take a strange enjoyment in reading format and protocol documentation, and I find it to be one of the most rewarding tasks. Hence the Sega emulator project, the DOOM project, the Vgm2Midi project and so on.
This project is more hardware related - it's an infrared remote control library for the TI-83 series calculators. It supports the SIRCS (Sony) protocol, with command words of 12, 15 and 20 bits.
Video of the library in action (960KB WMV).
The hardware is very simple if you just want to transmit, and a single-package infrared receiver/amplifier/demodulator makes the receiving circuit not that much more complex.
The library also comes with a program that can be used to turn an 83+ into a programmable remote control. It supports multiple device profiles, and editing is easy - press the key (on the calculator) you wish to customise, point your remote at the receiver and press the button you want change to and the details are automatically saved.


Subscribe to an RSS feed that only contains items with the Remote control tag.