Adapting a room from DOOM's E2M7 to the TI-83+ calculator
Thursday, 28th October 2010
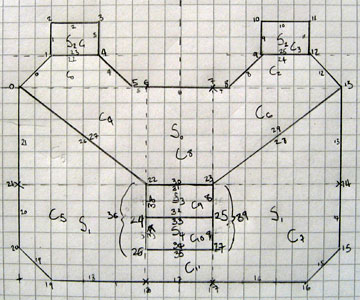
The level I've been working with as a test for the TI-83+ 3D engine was something I quickly threw together. I've never been much good at the design side of things, and my lack of imagination was producing something very simple that wasn't really challenging the engine and testing whether it could be used in a game. Looking for inspiration, I played through map E2M7 in DOOM and found a fairly interesting room to try to convert.

I'm sure you can tell which is the original room from DOOM and which is my adaptation of it.
Since the last post I have had to make quite a few tweaks to the engine. In the previous build there was a bug which cropped up when the top or bottom edges of walls appeared above or below the screen bounds. This turned out to be caused by a routine that was intended to clip a signed 16-bit integer to the range 0-63; it would return 0 for values 128 to 255 instead of 63. Fortunately this was an easy fix.
Another bug was in the way "upper and lower" walls were handled. Sectors have different heights and "upper and lower" walls go between two adjacent sectors and connect the ceiling of one to the other and the floor of one to the other, leaving a gap in the middle.
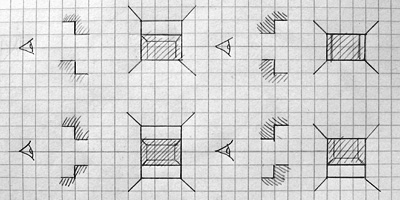
The above picture shows the four main types of sector-to-sector transition through an "upper and lower" wall type. Different transitions require different numbers of horizontal wall edges to be traced; in the bottom left example (going to a sector that has a lower ceiling and higher floor than the current one) four lines would be required and in the top right example (going to a sector that has a higher ceiling and lower floor than the current one) two lines would be required. The previous version of the engine always drew four lines, which would produce a spurious line above or below the "hole" for three out of the four different combinations of sector-to-sector transition. By comparing sector heights the right number of horizontal lines can be drawn, which greatly improves the appearance of the world and slightly increases the performance, too.
A less immediately obvious limitation was in my implementation of the BSP tree structure. Each node on the tree splits the world geometry into two halves; one half is in "front" of the partition and the other is "behind" it. Each chunk of split geometry can be further subdivided by additional partitions until you're left with a collection of walls that surround a convex region. You can then walk the tree, checking which side of each partition you are on to determine the order that the walls should be rendered in. For more detailed information the Wikipedia article on binary space partitioning is a good starting place but the basic requirement is that you should be able to slice up level geometry into convex regions with partitions. I had naïvely assumed that horizontal or vertical partitions would be sufficient (and they are useful as you can very quickly determine which side of a horizontal or vertical line the camera is on). However, this room demonstrated that such a limitation would not be practical.
Consider the above geometry. The black lines are walls and the small grey lines represent the wall normals; that is, the walls face the inside of the "Z". The wall in the middle is double-sided; you could put the camera above or below it and see it. However you slice that map up with horizontal or vertical partitions you will still end up with regions that are not convex.
A single partition along the central wall divides the map into two convex regions. I had initially thought that checking which side of such a partition the camera lay would be an expensive operation, but it's not too bad; as a line can be represented by the expression y=mx+c I can store the gradient m and y-intercept c in the level data and simply plug in the camera's x and compare to y to determine the side. A single multiplication and an addition isn't too much to ask for.
Fortunately, there are only two of these partitions in the level!
I have added some other features to the demo program. Pressing Zoom when using a calculator that can run at 15MHz (a TI-83+ SE or any TI-84+) toggles the speed between 6MHz and 15MHz. Pressing Mode or X,T,Θ,n allows you to look up or down. Pressing Window toggles between the default free movement and a mode which snaps you to a fixed height above the floor. These additions are shown in the below screenshot (click to view the animation):
Unfortunately, performance is lousy. Viewing the stairs drops the framerate to a rather sluggish 6 FPS when running at 6MHz (most of the above screenshot is recorded at 15MHz). The LCD's natural motion blur helps a little (it feels a lot more fluid on the calculator than it does on a PC emulator) but I'm aiming for a minimum of 10 FPS, so I need to make quite a few optimisations. There are several low-level ones that could be made; for example, when clipping the 2D line segments to the display I'm using a generic line clipper that clips the line both horizontally and vertically. As wall has been clipped to the horizontal field of view by that point I only really need to clip it to the top and bottom edges of the display. There are also some high-level optimisations to be made; for example, double-sided walls are currently stored as two distinct walls with the vertex order swapped. This means that to handle both sides of the wall the engine has to clip and project it twice, which involves lots of expensive divisions and multiplications. The results of these operations could be cached so that they only needed to be calculated once.
A TI-83 and TI-83+ binary is available if you'd like to try the demonstration on your calculator: please download Nostromo.zip. The usual disclaimers about backing up your data before running the program apply!